
4 posts tagged with "CRDs"

View All Tags

· 9 min read

Knative Routing

Knative는 앞에서도 몇번 언급하였지만 기본적으로 Routing을 사용하여 외부에 노출할 서비스들에 대한 HTTP Endpoint를 제공한다. 어떻게 보면 기본적으로 API Gateway 역할을 하기도 하고 Ingress 역할을 하기도 한다. 보통 Service mesh인 Istio를 사용하여 ingress를 구현하는것이 당연하다고 생각하기도 하지만 Istio의 모든 기능이 Knative에 필요하지는 않고 설치되는것 자체가 리소스 소모가 꽤 된다는것은 설치 해본사람은 알고 있을것이다.

Service

Kubernetes

ingress
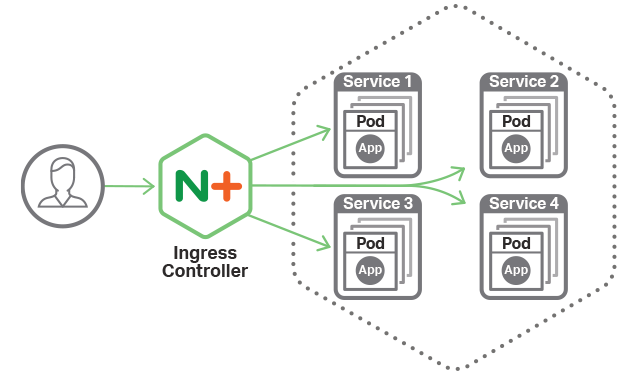
이미지출처 : https://www.nginx.com/blog/announcing-nginx-ingress-controller-for-kubernetes-release-1-3-0/

Kubernetes에서는 일반적으로 서비스 접속을 구현하게 되면 기본적으로 Pod와 Service를 생성하고 Ingress를 사용하여 클러스터 내부로 들어오는 트래픽을 처리하게 된다.

Knative

Serving
이미지출처 : https://blog.openshift.com/knative-serving-your-serverless-services/

Knative에서는 앞선 Knative 관련 포스팅에서도 설명했듯이 Automatic scaling up and down to zero 특성을 가지고 있기에 Pod가 최초 실행되어있지 않은 상태에서 트래픽이 들어오게 되면 Knative Serving Activator에 의해서 Pod가 없는 Revision을 확인하고 Cold Start 형태로 프로비저닝하게 된다. 나는 이게 진정한 서버리스라고 생각하지만 주변에 반박하시는 분들도 간혹 있다.

이후 Pod가 Warm 상태가 되고 나면 Istio Route(Ingress Gateway)를 통해 트래픽이 Pod로 전달되어 통신이 이뤄지게 된다.

현재 Knative는 현재 Ingress Gateway 의존성을 가지고 있고 Envoy기반 Service Mesh인 Istio, Envoy기반 API Gateway인 Gloo 두가지 옵션으로 Ingress 구현이 가능하다.

Istio

Knative는 기본적으로 Ingress Gateway기능을 탑재하고 있는데 이는 Istio의 기능중 하나다.
Istio는 다음과 같은 Core Feature를 가진다. 상세한 내용은 https://istio.io/docs/concepts/what-is-istio/ 에서 확인하면 된다.

  • Traffic management
  • Security
  • Policies and Telemetry
  • Performance and Scalability

Istio는 48개의 CRDs(CustomResourceDefinition objects)를 가지고 있는데 이중 Knative Serving에서 사용하는건 VirtualService 단 하나다.

Gloo

Gloo는 Kubernetes-native ingress controller이자 Next Generation API Gateway 를 위해 시작된 프로젝트이다. 실제 Redhat에서 Openshift기반 Microservice 및 Istio 개발업무를 하다가 최근에 solo.io의 CTO로 이직한 Christian Posta가 밀고 있는 프로젝트이기도 하다.

gloo

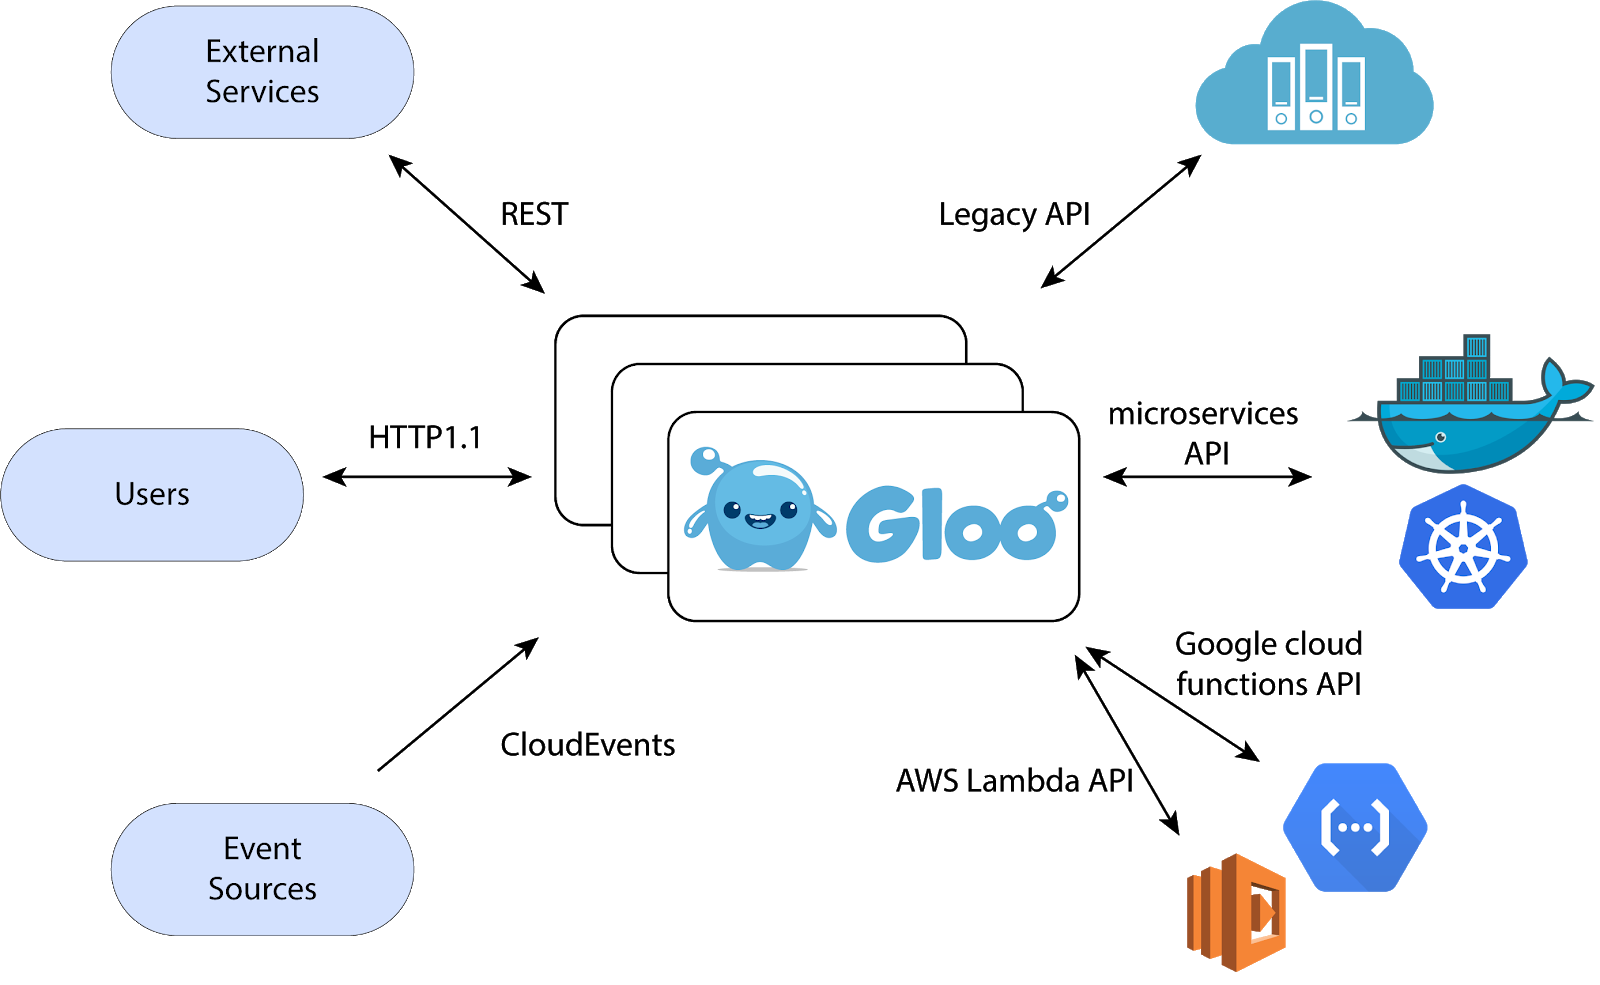
Gloo는 Envoy Proxy 기반으로 동작하며 기존 Legacy부터 Container서비스, FaaS(AWS Lambda, Azure Functions, GCP Functions)영역의 Application들을 REST, gRPC, SOAP, Web Socker기반으로 Aggregate 해서 Function 기반 추상화를 구현해 주는 오픈소스 프로젝트라 정의 할 수 있다.

Istio의 Ingress기능외의 여러가지 부가 기능(Telemetry, Security, Policy Enforcement)들은 Knative에서는 필요로 하지 않는다.

Knative API Gateway 로서 Istio가 아닌 Gloo가 조금더 경량화된 대안으로 결정되었고 Gloo를 통해 Knative 설치가 가능하게 되었다. 단, Knative Eventing 컴포넌트는 현재 지원하지 않는다고 한다.

Install Knative with Gloo

참고: Install with Gloo

간단하게 gloo와 Knative 설치를 해보자.

Requirements

Install Glooctl

gloo CLI (glooctl) Download
https://github.com/solo-io/gloo/releases

또는 직접 Download

$ curl -sL https://run.solo.io/gloo/install | sh
Attempting to download glooctl version v0.8.1
Downloading glooctl-darwin-amd64...
Download complete!, validating checksum...
Checksum valid.
Gloo was successfully installed 🎉

Add the gloo CLI to your path with:
export PATH=$HOME/.gloo/bin:$PATH

Now run:
glooctl install gateway # install gloo's function gateway functionality into the 'gloo-system' namespace
glooctl install ingress # install very basic Kubernetes Ingress support with Gloo into namespace gloo-system
glooctl install knative # install Knative serving with Gloo configured as the default cluster ingress
Please see visit the Gloo Installation guides for more: https://gloo.solo.io/installation/

PATH 등록

$ export PATH=$HOME/.gloo/bin:$PATH

gloo CLI 확인

$ glooctl --version
glooctl version 0.8.1

GCP 무료플랜으로 3-node 클러스터를 생성한다.

$ gcloud container clusters create gloo \
--region=asia-east1-a \
--cluster-version=latest \
--machine-type=n1-standard-2 \
--enable-autorepair \
--num-nodes=3

cluster 생성된것을 확인하고 cluster-admin 권한을 할당한다.

$ kubectl get nodes
NAME STATUS ROLES AGE VERSION
gke-gloo-default-pool-f6bcc479-f8v9 Ready <none> 9m v1.11.7-gke.6
gke-gloo-default-pool-f6bcc479-fl78 Ready <none> 9m v1.11.7-gke.6
gke-gloo-default-pool-f6bcc479-gfgw Ready <none> 9m v1.11.7-gke.6

$ kubectl create clusterrolebinding cluster-admin-binding \
> --clusterrole=cluster-admin \
> --user=$(gcloud config get-value core/account)
Your active configuration is: [cloudshell-25974]
clusterrolebinding.rbac.authorization.k8s.io "cluster-admin-binding" created

Gloo와 Knative 설치를 한다. 미리 glooctl install knative --dry-run 으로 전체 manifest를 확인할 수 있다.

$ glooctl install knative

위에서 설치 과정은 생략했지만 Istio에 비해 CRD 개수가 적은 것을 알수있다. 또한 설치된 컴포넌트 역시 Istio에 비해서 간소화된 것을 알수 있다.

$ kubectl get pods --namespace gloo-system                                                                                         
NAME READY STATUS RESTARTS AGE
clusteringress-proxy-59fd6fb56-dmwwm 1/1 Running 0 7m
discovery-779884d4cc-xlql2 1/1 Running 6 7m
gloo-844fc79445-f4zvg 1/1 Running 6 7m
ingress-7d75c99874-s4m76 1/1 Running 6 7m

$ kubectl get pods --namespace knative-serving
NAME READY STATUS RESTARTS AGE
activator-746f6bb684-49tfh 1/1 Running 0 12m
autoscaler-955f679cd-tx5vw 1/1 Running 0 12m
controller-7fc84c6584-jbn69 1/1 Running 0 12m
webhook-7797ffb6bf-6pgsw 1/1 Running 0 12m

이전 포스팅에서도 사용했던 gcr.io/knative-sample/helloworld-go 이미지를 활용하여 샘플앱 Knative Service를 만든다.

service.yaml

$ vi service.yaml

apiVersion: serving.knative.dev/v1alpha1
kind: Service
metadata:
name: helloworld-go
namespace: default
spec:
runLatest:
configuration:
revisionTemplate:
spec:
container:
image: gcr.io/knative-sample/helloworld-go
env:
- name: TARGET
value: "Go Sample v1"
$ kubectl apply --filename service.yaml
service.serving.knative.dev "helloworld-go" created

앞에서도 설명했지만 Automatic scaling up and down to zero 으로 Cold Start가 되고 잠시후에 아래와 같이 Knative Service를 확인할 수 있다.

$ kubectl get ksvc helloworld-go -n default  --output=custom-columns=NAME:.metadata.name,DOMAIN:.status.domain]($ kubectl get ksvc helloworld-go -n default  --output=custom-columns=NAME:.metadata.name,DOMAIN:.status.d
omain
NAME DOMAIN
helloworld-go helloworld-go.default.example.com

Gloo Ingress를 확인한다. GKE에서 설치했기 때문에 자동으로 LoadBalancer가 연동되어 있는것을 확인할 수 있다.

$ kubectl get svc -n gloo-system
NAME TYPE CLUSTER-IP EXTERNAL-IP PORT(S) AGE
clusteringress-proxy LoadBalancer 10.3.244.54 34.**.**.54 80:30978/TCP,443:32448/TCP 39m
gloo ClusterIP 10.3.243.231 <none> 9977/TCP 39m

$ glooctl proxy url --name clusteringress-proxy
http://34.**.**.54:80

위에서 얻은 두가지 정보로 생성된 app을 테스트한다. Cold Start(default timeout 5분) 때문에 응답이 늦어질 수도 있지만 잠시 기다리면 응답을 확인할 수 있다.

$ curl -H "Host: helloworld-go.default.example.com" http://34.**.**.54:80
Hello Go Sample v1!

물론 Revision이나 Route를 활용하여 Knative의 기능에 대해서도 확인이 가능하다.

정리

Gloo는 Knative ClusterIngress CRD를 기반으로 동작하는 Istio의 대안으로서 가능성을 보여주고 있다. 이외에도 The Service Mesh Orchestration Platform SuperGloo, Debugger for microservices Squash 등 다양한 Mesh Layer기반의 오픈소스들을 확인할수 있다. 또다른 스쳐지나갈수도 있는 오픈소스일수도 있겠지만 현재 개발되는 로드맵(https://www.solo.io/)을 보면 Knative가 고도화되는 여정에 같이 가는 모습을 확인할 수 있다.

next-generation API Gateway로서 다양한 프로토콜을 지원하기 때문에 (HTTP1, HTTP2, gRPC, REST/OpenAPISpec, SOAP, WebSockets, Lambda/Cloud Functions) 더욱더 Microservices 및 Serverless Workload를 수행하기에 더욱 적합한 오픈소스로 보인다.

다음 주제

현재 해보고 싶은것은 베어메탈 Kubernetes Cluster기반 BGP로 동작하는 MetalLBCillium on AWS 인데 시간나는 대로 테스트 해봐야 겠다.

· 15 min read

knctl

knctl 은 Knative CLI 툴로 간단하게 knative cluster를 만들고 Knative를 추상화해서 앱까지 배포할 수 있는 오픈소스이다.

참고

Knative 다시 살펴보기

앞선 포스팅에서도 이야기 했지만 기존 FaaS(AWS Lambda, Google Cloud Funtions, Azure Function) 과는 다른 Serverless 개념으로 받아들어야 한다.

다시 한번 특징을 나열해보면 아래와 같다.

  • Serverless Container의 신속한 배치
  • Automatic scaling up and down to zero
  • Istio를 백엔드로 활용하여 Routing 구현
  • 배포 된 코드 및 config의 특정 시점 스냅 샷

그리고 다음과 같은 CRDs(Custom Resource Definitions)로 구성된 오브젝트들로 정의된다.

  • Route는 사용자 서비스에 대한 HTTP endpoint와 Routing을 제공한다.
  • Revisions은 code(function)와 config로 구성된 불변의 스냅샷. Route를 통해 endpoint를 할당받지 못한 Revision은 자동으로 kubernetes resource에서 삭제됨
  • Configuration은 요구되는 Revision 최신 상태를 기록하고 생성하고 추적할수 있음. 소스 패키지(git repo나 archive)를 컨테이너로 변환하기 위한 내용이나 메타데이터등을 포함시킬수 있음.
  • ServiceRoutesConfigurations 리소스의 추상화된 집합체. 모든 워크로드의 lifecycle을 관리함. 트래픽을 항상 최신의 Revision으로 route되도록 정의할수 있음

하나씩 조금 자세히 이야기 하면 아래처럼 정리 할수 있다.

Route

Route는 사용자 서비스(Code와 Configuration의 Revision정보)의 네트워크 Endpoint를 제공한다. kubernetes namespace는 여러개의 Route를 가질수 있다. Route는 하나 이상의 Revisions을 가지면서 수명이 길고 안정적인 HTTP Endpoint를 제공한다. 기본구성은 Route 객체가 Configuration에 의해 생성된 최신의 Revision으로 트래픽을 자동으로 지정한다. 조금더 복잡한 경우로는 istio의 기능을 활용하여 트래픽을 백분율 기준으로 Route를 지정할 수 있다.

Revision

Revision은 Code와 Configuration의 불변의 스냅샷이다. 하나의 Revision은 컨테이너 이미지를 참조하고 선택적으로 Build를 참조할 수 있다. RevisionConfiguration이 업데이트 시 생성된다.
Route를 통해 http주소 지정이 불가능한 Revision은 폐기 되고 관련된 kubernetes 리소스가 삭제가 된다. 시간이 지남에 따라 Configuration이 생성한 Revision 히스토리가 제공되고 사용자는 이전 Revision로 쉽게 롤백 할 수 있다.

Configuration

Configuration은 최신의 Revision상태를 설명하고, 생성하고, 원하는 상태가 갱신될때 Revision의 상태를 추적한다. ConfigurationBuild를 참조하여 소스(git repo 또는 archive)를 컨테이너로 변환하는 방법에 대한 가이드가 포함되어 있거나 단순히 컨테이너 이미지 및 수정에서 필요한 메타 데이터 만 참조 할 수 있다.

Product Integration

2019년 2월 현재 0.3이 릴리스되고 있고 벌써 여러 제품에 통합이 되고 있다.

최근 IBMthink 2019에서 Managed Knative (Experimental)를 내놓기도 하였다.
https://www.ibm.com/blogs/bluemix/2019/02/announcing-managed-knative-on-ibm-cloud-kubernetes-service-experimental/

Istio를 포함한 Knative 마저도 품는 모습으로 managed kubernetes 영역에서 글로벌 플레이어들 모두 서로 치고나가는 모습들을 볼수 있다.

작년 11월에는 Gitlab 제품안에 serverless라는 extension형태의 서비스가 추가 되기도 하였고,
https://about.gitlab.com/press/releases/2018-12-11-gitlab-and-triggermesh-announce-gitlab-serverless.html

triggermesh 라는 곳에서는 serverless management platform이라는 이름으로 knative 기반 멀티 서버리스 플랫폼을 출시하기도 하였다.
https://triggermesh.com/serverless_management_platform/

Pivotal Function Service (PFS), Google GKE SERVERLESS ADD-ON 등은 아직 early access 신청만 받고 있는 상태이다.

오늘은 간단하게 배포할수 있는 툴 knctl과 관련 use-case를 소개하고자 한다.

Kubernetes Cluster 생성

일단 GKE Free tier에서 Cluster를 하나 생성하자.

gcloud container clusters create knative \
--region=asia-east1-a \
--cluster-version=latest \
--machine-type=n1-standard-2 \
--enable-autoscaling --min-nodes=1 --max-nodes=5 \
--enable-autorepair \
--scopes=service-control,service-management,compute-rw,storage-ro,cloud-platform,logging-write,monitoring-write,pubsub,datastore \
--num-nodes=3

cluster 생성된것을 확인하고 cluster-admin 권한을 할당한다.

$ kubectl get nodes
NAME STATUS ROLES AGE VERSION
gke-knative-default-pool-d1a39347-5m5t Ready <none> 1m v1.11.7-gke.4
gke-knative-default-pool-d1a39347-l6zh Ready <none> 1m v1.11.7-gke.4
gke-knative-default-pool-d1a39347-qv5r Ready <none> 1m v1.11.7-gke.4

$ kubectl create clusterrolebinding cluster-admin-binding \
--clusterrole=cluster-admin \
--user=$(gcloud config get-value core/account)
Your active configuration is: [cloudshell-4728]
clusterrolebinding.rbac.authorization.k8s.io "cluster-admin-binding" created

knctl 설치

이번 포스팅에서는 Mac OS 설치 기준으로 작성하였다.

homebrew 설치

brew install starkandwayne/kubernetes/knctl

binary

https://github.com/cppforlife/knctl/releases

$ wget https://github.com/cppforlife/knctl/releases/download/v0.1.0/knctl-darwin-amd64
$ mv knctl-* /usr/local/bin/knctl
$ chmod +x /usr/local/bin/knctl

knctl 로 Knative 배포

설치한 knctl로 Knative 배포를 진행한다. 설치되는 내용을 지켜보고 있으면 istio를 먼저 배포하고 그다음에 Knative를 설치하는 것을 확인할 수 있다. 배포되는 모듈들의 상태를 하나하나 체크해서 배포하기 때문에 설치상에 과정들을 확인할 수 있다.

$ knctl install --exclude-monitoring

테스트를 위한 namespace hello-test를 생성한다.

$ kubectl create namespace hello-test
namespace "hello-test" created

knctl deploy 명령으로 최초 revision을 배포한다.
아래 결과를 보면 hello-00001 이라고 하는 최초의 revision을 작성하기 때문에 latest tag를 달고 배포를 하게 된다.

$ knctl deploy \
--namespace hello-test \
--service hello \
--image gcr.io/knative-samples/helloworld-go \
--env TARGET=Rev1

Name hello

Waiting for new revision to be created...

Tagging new revision 'hello-00001' as 'latest'

Tagging new revision 'hello-00001' as 'previous'

Annotating new revision 'hello-00001'

Waiting for new revision 'hello-00001' to be ready for up to 5m0s (logs below)...

hello-00001 > hello-00001-deployment-5cdbfc9bc9-hks6t | 2019/02/17 22:27:50 Hello world sample started.

Revision 'hello-00001' became ready

Continuing to watch logs for 5s before exiting

Succeeded
kubectl get svc knative-ingressgateway -n istio-system
NAME TYPE CLUSTER-IP EXTERNAL-IP PORT(S) AGE
knative-ingressgateway LoadBalancer 10.63.253.209 34.***.***.248 80:32380/TCP,443:32390/TCP,31400:32400/TCP,15011:30082/TCP,8060:31125/TCP,853:32009/TCP,15030:31102/TCP,15031:31631/TCP 6h

위처럼 Knative가 프로비저닝 되면서 ingress-gateway가 하나 생성이 되어있는 것을 확인할 수 있고 knctl로도 ingress를 확인이 가능하다.

$ knctl ingress list
Ingresses

Name Addresses Ports Age
knative-ingressgateway 34.***.***.248 80 6h
443
31400
15011
8060
853
15030
15031

1 ingresses

Succeeded

Knative custom domain 연결

Domain이 별도로 없기 때문에 Knative는 내부적으로 example.com이라고 하는 기본 domain을 사용한다. 그래서 실제 knctl curl 명령은 내부적으로 hello.hello-test.example.com으로 curl을 실행하게 되고 해당 결과를 아래와 같이 확인할 수 있다.

$ knctl curl --service hello -n hello-test
Running: curl '-sS' '-H' 'Host: hello.hello-test.example.com' 'http://34.***.***.248:80'

Hello Rev1!

Succeeded

kubernetes node가 3개이므로 3개의 pod가 생성된 것을 확인할 수 있다. 일정시간(default:5분)이 지나면 zero to scale 관점에서 pod가 종료되므로 다시 확인할때는 다시 curl 명령을 날리게 되면 다시 pod가 올라오게 된다. 해당 개념은 FaaS또는 AWS Lambda에서 Cold-Start와 동일한 것이라 볼 수 있다.

AWS Cold Start 참고 : https://novemberde.github.io/aws/2018/02/02/Lambda_coldStart.html

$ kubectl get po
NAME READY STATUS RESTARTS AGE
hello-00001-deployment-5cdbfc9bc9-hks6t 3/3 Running 0 4m

가지고 있는 도메인이 있다면 위에서 나온 34.***.***.248 IP를 domain에 매핑해보자. 아래에서는 기존 보유중인 skcloud.io 도메인을 연결하였다.

$ dig knative.skcloud.io
;; ANSWER SECTION:
knative.skcloud.io. 603 IN A 34.***.***.248

knctl domain을 이용하여 default domain을 knative.skcloud.io로 변경한다.

$ knctl domain create -d knative.skcloud.io --default
Succeeded

knctl routes 명령으로 해당 hello-test app의 Endpoint 정보를 확인할 수 있다.

$ knctl routes list -n hello-test
Routes in namespace 'hello-test'

Name Domain Traffic Annotations Conditions Age
hello hello.hello-test.knative.skcloud.io 100% -> hello - 3 OK / 3 1h

1 routes

Succeeded

5분이상 기다렸다가 curl로 확인하면 Cold-Start 되는 시간(몇초) 지연이 발생하고 결과를 확인할 수 있다. 이후에는 바로 응답을 확인할 수 있다.

$ curl http://hello.hello-test.knative.skcloud.io/
Hello Rev1!

revision 추가

이번에는 revision을 추가해보자. TARGET environment 변수를 Rev2로 수정하고 배포를 한다. 기존 hello-00002 revision이 최신 revision으로 갱신되어 배포가 되는것을 확인할 수 있다.

$ knctl deploy --service hello \
--image gcr.io/knative-samples/helloworld-go \
--env TARGET=Rev2
Name hello

Waiting for new revision (after revision 'hello-00001') to be created...

Tagging new revision 'hello-00002' as 'latest'

Tagging older revision 'hello-00001' as 'previous'

Annotating new revision 'hello-00002'

Waiting for new revision 'hello-00002' to be ready for up to 5m0s (logs below)...

hello-00002 > hello-00002-deployment-6cf86bbfc7-sblz9 | 2019/02/17 23:25:43 Hello world sample started.

Revision 'hello-00002' became ready

Continuing to watch logs for 5s before exiting

Succeeded

신규 revision 서비스를 추가된것을 확인할 수 있다. 마찬가지로 몇초간의 Cold-Start delay가 발생할 수도 있다.

$ curl http://hello.hello-test.knative.skcloud.io/
Hello Rev2!

$ knctl curl --service hello
Running: curl '-sS' '-H' 'Host: hello.hello-test.knative.skcloud.io' 'http://34.***.***.248:80'

Hello Rev2!

Succeeded

revision list를 확인해보면 현재 latest, previous TAG정보를 확인할 수 있다.

$ knctl revision list --service hello
Revisions for service 'hello'

Name Tags Annotations Conditions Age Traffic
hello-00002 latest - 1 OK / 4 14m 100% -> hello.hello-test.knative.skcloud.io
hello-00001 previous - 1 OK / 4 4h -

2 revisions

Succeeded

Blue/Green 배포

Blue/Green Deploy는 knctl rollout 명령으로 수행할수 있다.
rollout 할때 --managed-route=false 옵션을 줘야 특정 비율로 routing이 가능하다.
아래 예시는 TARGET environment 변수를 blue, green으로 바꿔가면서 배포를 진행하였다.

$ knctl deploy --service hello \
--image gcr.io/knative-samples/helloworld-go \
--env TARGET=blue \
--managed-route=false
Name hello

Waiting for new revision (after revision 'hello-00002') to be created...

Tagging new revision 'hello-00003' as 'latest'

Tagging older revision 'hello-00002' as 'previous'

Annotating new revision 'hello-00003'

Waiting for new revision 'hello-00003' to be ready for up to 5m0s (logs below)...

Revision 'hello-00003' became ready

Continuing to watch logs for 5s before exiting

hello-00003 > hello-00003-deployment-99478dcc5-jf267 | 2019/02/17 23:48:20 Hello world sample started.

Succeeded

revision list를 확인하면 아래와 같이 latest로 Traffic 전체가 routing 되는 것을 확인할 수 있다.

$ knctl revision list --service hello
Revisions for service 'hello'

Name Tags Annotations Conditions Age Traffic
hello-00005 latest - 4 OK / 4 44s 100% -> hello.hello-test.knative.skcloud.io
hello-00004 previous - 4 OK / 4 2m -
hello-00003 - - 1 OK / 4 5m -
hello-00002 - - 1 OK / 4 28m -
hello-00001 - - 1 OK / 4 4h -

5 revisions

Succeeded

이후에 rollout을 통해 previous로 90%, latest로 10%로 변경을 하면 즉시 반영이 되고 실제 트래픽도 분산되어 들어온다. %가 낮은 쪽으로 routing이 될 경우 Cold-Start가 발생하게 되면 delay는 발생하게 된다.

$ knctl rollout --route hello -p hello:latest=10% -p hello:previous=90%
Succeeded

$ knctl revision list
Revisions

Service Name Tags Annotations Conditions Age Traffic
hello hello-00005 latest - 2 OK / 4 1h 10% -> hello.hello-test.knative.skcloud.io
~ hello-00004 previous - 2 OK / 4 1h 90% -> hello.hello-test.knative.skcloud.io
~ hello-00003 - - 1 OK / 4 1h -
~ hello-00002 - - 1 OK / 4 1h -
~ hello-00001 - - 1 OK / 4 5h -

5 revisions

Succeeded

간단하게 curl 반복문을 작성하여 돌려보자.

#!/bin/sh
while true
do
curl -sS --max-time 3 http://hello.hello-test.knative.skcloud.io/
done

간단하게 위 sh을 돌리면 아래와 같이 Cold-Start delay가 발생할때 time out이 발생하고 이후 green revision으로 접속이 되는것을 볼 수 있다.

$ ./test.sh
curl: (28) Operation timed out after 3002 milliseconds with 0 bytes received
Hello blue!
Hello blue!
Hello blue!
Hello blue!
Hello blue!
curl: (28) Operation timed out after 3003 milliseconds with 0 bytes received
Hello blue!
Hello blue!
Hello blue!
Hello blue!
Hello blue!
Hello blue!
Hello green!
Hello blue!
Hello blue!
Hello blue!

정리

지금까지 knctl을 사용하여 간단하게 knative를 배포하고 custom domain을 연결하여 blue-green 배포까지 해봤다. 이외에도 Knative Build를 활용하여 Docker image 작업을 하거나 서비스 카탈로그 등을 연동하여 외부 DBaaS를 연동하는 use-case등을 찾아볼수 있다.

아직 초기 단계이지만 Knative는 istio와 함께 IBM, Google, Pivotal등 global player들의 차세대 오픈소스로 부상하고 있다고 볼 수 있다.

Zero to scale 이라는 슬로건아래 Serverless, FaaS 사상을 기반으로 build, serving, event, routing이라고 하는 Cloud Computing 추상화의 끝판으로 진화하고 있다. 앞으로 어떤 모습으로 진화될지 궁금하고 다음번에는 MQ나 Pub/sub를 연동하거나 멀티 클라우드 환경에서 동작하는 모습을 보여주는 것도 좋을것 같다. 희망사항이지만 올해 OpenInfraDay나 Kubernetes Day Korea 행사에서 Hands-on을 진행해보는것도 좋지 않을까?

· 9 min read

Knative

미친놈들 모여서 미친것을 만들었군.. ㅎㅎ 예상했던 내용들을 현실로 만드는 클라스

Kubernetes 관련 비지니스를 하고 있는 입장에서 봐도 놀랄일이지만 인프라 영역부터 개발자 영역까지 모두를 추상화시키는 클라우드 네이티브의 힘이란 참 대단하다.

오늘은 knative에서 주요기능들을 둘러보고자 한다.

개인적인 생각은 Kubernetes 진영이라고 해야하나 CNCF 진영이라고 해야하나.. 그동안 노래를 부르고 주목했던 CRDs, Operators, Serverless Workload, CloudEvents, Mesh Layer 개념과 영역을 흡수해서 그 기반으로 확장시키고 있다.

kubectl apply -f https://storage.googleapis.com/knative-releases/serving/latest/release.yaml

위 코드 내용을 상세하게 보고있지만 담은것들이 정말 많다. 그래도 다 이해하려면 하나하나 챙겨봐야 한다.

오늘은 일단 코어 기능만 살펴본다.

Build

build는 Knative의 주요 custom resource이고 이를 이용하여 fetch, build, package를 수행한다. repo의 소스를 빌드하고 컨테이너로 이미지로 만들고 그다음에 Knative Serving으로 보낸다고 한다.

Build 용어

  • Build는 여러 steps을 포함하고 Builder로 구체화된다
  • Builder는 컨테이너 이미지 유형
  • Buildsteps은 repository에 push를 할 수 있음
  • BuildTemplate 는 재활용가능한 템플릿
  • Buildsource는 kubernetes Volume으로 mount되는 데이터를 정의할수 있고 git, Google Cloud Storage, 컨테이너 이미지를 지원함.
  • kubernetes Secret을 사용하여 ServiceAccount로 인증함

Serving

Knative Serving은 Kubernetes와 Istio를 기반으로 Serverless Workload가 클러스터에서 작동하는 방식을 정의하고 제어하는데 사용된다고 하지만 엄연히 Public FaaS(AWS Lambda등)와는 구별되어야 한다고 생각한다.

Serverless 라고 하는 용어를 쉽게 생각하는 사람들이 많은데 결국 나중에는 간단한 애플리케이션들은 다 Serverless 스타일로 전환될것이라는 사상을 서비스나 플랫폼에 넣고 있는 추세다.

CNCF 진형의 Cloud Event라고 하는 이벤트 그리드방식의 표준화를 따라 가는것인지 아니면 새로운 스타일을 정의하려고 하는것인지는 그들의 향후 Cloud Native 로드맵에 달려있다 해도 무방할것 같다.

  • Serverless Container의 신속한 배치가 가능
  • Automatic scaling up and down to zero
  • Istio Component
  • 배포 된 코드 및 config의 특정 시점 스냅 샷

Serving Resources

CRDs로 정의한 Objects 집합체, 이러한 Object들은 Serverless 워크로드 형태로 정의되고 사용된다. 가장 인상깊고 중요한 문구는 Request-driven compute that can scale to zero 인 것 같다.

한동안 유행했던 OpenPaaS, CF기반의 PaaS 플랫폼을 뛰어넘는 구축형 그것도 스프링부트 영역까지도 kubernetes 기반 이벤트 드리븐 서버리스로 간다는 이야기...

이미 퍼블릭으로는 GA도 되었다.

우리 팀원들과 함께 열심히 vmware dispatch framework으로 개발하고 있지만 결국 pivotal과 vmware는 거의 한몸이기에 더욱 더 변화가 필요한 순간이다.

serving

  • Route는 사용자 서비스에 대한 HTTP endpoint를 제공.
  • Revisions은 code(function)와 config로 구성된 불변의 스냅샷. Route를 통해 endpoint를 할당받지 못한 Revision은 자동으로 kubernetes resource에서 삭제됨
  • Configuration은 요구되는 Revision 최신 상태를 기록하고 생성하고 추적할수 있음. 소스 패키지(git repo나 archive)를 컨테이너로 변환하기 위한 내용이나 메타데이터등을 포함시킬수 있음.
  • ServiceRoutesConfigurations 리소스의 추상화된 집합체. 모든 워크로드의 lifecycle을 관리함. 트래픽을 항상 최신의 revision으로 route되도록 정의할수 있음

Events

CNCF의 CloudEvent Spec. 기반으로 하는 이벤트를 produce/comsume 하는 방법을 제공한다. 플러그인 형태로 이벤트를 수신할수 있고 다양한 pub/sub 스타일의 broker service를 통해 제공될수 있다.

Azure는 이미 EventGrid서비스를 GA를 한 상황이고 Pivotal 진영도 Serverless Workload는 Knative기반으로 넘어간다고 했으니 Dispatch 도 결국 따라가지 않을까 생각해본다.

eventing_concept

Bus

Kafka나 Nats와 같은 메시지 Bus를 통해 K8s기반의 pub/sub을 제공하는 개념. 이벤트는 Channel에 의해 게시되고 관심있는 사람에게 라우팅됨.

  • Channel : 여기서 이야기 하는 채널은 특정 bus에 사용되는 이벤트를 받기 위한 네트워크 기반 엔드포인트
  • Subscription : Channel에서 수신한 이벤트를 관심있는 target, DNS이름으로 표현되는 이벤트에 연결함
  • Bus : (kafka topic에 이벤트가 전달되는것 처럼) 특정 지속성 전략을 사용하여 Channel과 Subscription을 구현하는데 필요한 적용 계층을 정의함

현재 3가지의 Bus가 제공됨 (Kafka, Stub, GCP PubSub)

Sources

Source는 K8s 외부의 데이터 소스를 프로비저닝하고 이를 클러스터로 라우팅하기 위한 추상화 레이어를 제공함. 아래와 같은 소스들을 제공하고 있음

  • Feed : EventType과 Action (CloudEvents 호환 HTTP endpoint)간의 연결을 정의하는 기본 객체
  • EventType and ClusterEventType : EventSource에서 분리되는 공통스키마로 특정 이벤트의 집합, EventType은 Namespace 범위내에서 사용되고 ClusterEventType은 모든 Namespace에서 사용될수 있도록 관리자에 의해 설치됨
  • EventSource and ClusterEventSource : 하나 이상의 EventTypes를 생성 할 수있는 외부 시스템을 기술함

현재 3가지 Sources를 제공함

  • K8sevents : Kubernetes Events를 수집하고 CloudEvents 타입으로 표시함
  • Github : PR(pull request) notification을 수집하고 CloudEvents 타입으로 표시함
  • GCP PubSub : GCP PubSub topic으로 publish된 이벤트를 수집하고 CloudEvents 타입으로 표시함

Flows

마지막으로 Source에서 Endpoint까지 묶어주는 Flow라고 부르는 높은 수준의 추상화가 있다. Spec으로 이벤트가 라우팅된 Channel과 Bus를 기재하여 사용할 수 있다. Flow는 Eventing에서 최상위 개념으로 사용자가 선택할수 있고, 외부 Source 이벤트에서 목적지까지 원하는 경로를 기술할수 있다.

정리

워낙 방대한 양을 가지고 있고 이해하려고 노력하면서 적다보니 번역위주로 되어버렸다. 원래 다음번에 Nats Streaming을 다룰 예정이였으나, 당분간은 knative 구성요소를 이해하고 적용하는 위주로 포스팅을 할 예정이다. 아마도 모듈별(Serving, Building, Eventing) 시리즈가 될 듯 하다.

· 11 min read

Operators in Kubernetes

Operators 란?

정의(Definition) : Kubernetes Application 을 패키징, 배포, 관리하는 방법. Helm과는 조금 달라 따로 이야기 해보고자 한다.

기본적으로 Kubernetest Application은 kubernetes에 의해 배포되고 kubect과 kube-API를 사용하여 관리한다.

결론적으로 말하면 Kubernetes에 내가 만든 application을 서비스하고 관리하려면 결국 Kubernetes의 API들을 모두 이해하고 사용할수 있어야 한다. 일반적인 개발자에게 진입장벽이 어느정도 있다고 보여지며 이를 모두 이해시키는것도 조직적인 측면에서는 낭비일수 도 있다. 그래서 Helm등을 통한 application배포 전략을 세우기도 하지만 이것도 한계가 있을수 있다. 그래서 Operator는 Kubernetes상에서 application을 관리하는 런타임이라고 생각하는게 맞는것 같다.

etcd

Operators

Operators는 application마다 운영정보를 넣을수 있다.

Kubernetes 에 배포된 응용프로그램의 모든 특성을 알 필요가 없고 이를 통해 사용자는 매니지드 클라우드 서비스 경험(기존 IaaS/PaaS관리와 유사)과 유사하게 운영이 가능하다.

Operator가 배포되면 Kubernetes API확장 개념인 CRDs(Custom Resource Definitions)을 사용하여 관리할수 있다. Kubernetes에 Stateful 서비스를 배포하는 단순하고 좋은 방법이 될수 있다.

예를 들면, Postgres 클러스터, Prometheus 클러스터, Etcd 클러스터 같이 운영측면의 application들을 유지, 운영하는데 쓰일수 있다. (자세한건 뒤쪽 예시로 설명하겠다)

그러면 먼저 CRDs(Custom Resource Definitions)에 대해서 먼저 알아본다. CRDs에 대해서는 별도로 정리하려 하다가 내용이 많이 않아 핵심적인 내용만 같이 적어본다.

  • Custom Resource Definitions(a.k.a CRDs)
  • k8s Object를 확장해서 사용할 수 있는 가장 간단한 방법
  • CRDs는 Kubernetes의 확장 기능
  • Kubernetes 사용자가 클러스터내에서 직접 custom Object를 yaml형태로 생성, 수정, 삭제, 사용할수 있도록 하는 기능
    • K8s database(etcd)와 API를 그대로 활용할 수 있음)
    • CRUD 가능 (Create, Read, Update, Delete)
  • 모든 클러스터에 동적으로 resource 등록/삭제 가능
  • Operators는 CRDs를 포함하고 있음
    • Operator를 추가하면 CRDs가 등록됨
  • Resource 당 하나의 API 버전만 지원(~1.10버전, 1.11버전 이후 개수 제한 없어짐)
  • 1.8+ 이후부터 JSON 스키마 유효성 검증 가능 *주의사항 : etcd가 별도 분리된 managed서비스나 etcd 인스턴스가 분리된 환경에서 사용권고

주요 활용용도

  • Operators
  • Application 정보 저장
  • RouteRule on istio
  • GameServer on Agones

CRDs 관련 발표자료

https://ddiiwoong.github.io/2018/openinfraday18/

Operators example

etcd, Rook, Prometheus, Vault, MySQL, Postgres, Redis, kafka-비공식 등 Operator로 배포될수 있는 예시들은 해당 링크를 보면 자세히 확인할 수 있다. (오라클이 공격적으로 K8s비지니스로 뛰어드는듯한 그림이다…)

주로 저장소나 키-밸류 스토어, RDB등의 운영안정성을 위한 클러스터 구성을 위한것들이 대부분이며 점점 도입을 해나가는 추세이긴것 같긴 하다. 이번에 진행해보고자 하는건 분산 키-밸류 스토어이자 kubernetes의 메인저장소로 쓰이는 etcd 이다.

기본적으로 etcd cluster objects는 CRDs로 생성한다. Kubernetes 기본 resource가 아닌 CRDs 이기 때문에 안정성 측면에서 불안하다고 생각할수도 있다. 하지만 User Aggregated API Servers 를 적용하여 안정성, 유효성 검사 및 버전 관리가 개선되었다고 한다. Aggregated API를 사용하면 사용자에게 최소한의 영향을 주면서 Kubernetes objects가 생성되거나 사용자가 etcd operator를 배포,관리할수 있다. (말이 길어서 그렇지 그냥 etcd 클러스터 구성)

현재 프로젝트는 베타로 0.9.2까지 나와 있으며 RedHat이 CoreOS를 합병하는 바람에 문서들이 업데이트가 늦어지는것 같긴하지만 조만간에 1.0이 나올것 같긴 하다.

etcd-operator

etcd operator는 기본적으로 다음과 같은 기능을 한다.

  • Create and Destroy
  • Resize
  • Failover
  • Rolling upgrade
  • Backup and Restore

Requirements

  • Kubernetes 1.8+
  • etcd 3.2.13+

Installation guide

설치는 단순하다. 먼저 RBAC설정을 한다.

$ git clone https://github.com/coreos/etcd-operator.git
$ cd etcd-operator
$ example/rbac/create_role.sh

그리고 etcd-operator 배포

$ kubectl create -f example/deployment.yaml
apiVersion: extensions/v1beta1
kind: Deployment
metadata:
name: etcd-operator
spec:
replicas: 1
template:
metadata:
labels:
name: etcd-operator
spec:
containers:
- name: etcd-operator
image: quay.io/coreos/etcd-operator:v0.9.2
command:
- etcd-operator
# Uncomment to act for resources in all namespaces. More information in doc/clusterwide.md
#- -cluster-wide
env:
- name: MY_POD_NAMESPACE
valueFrom:
fieldRef:
fieldPath: metadata.namespace
- name: MY_POD_NAME
valueFrom:
fieldRef:
fieldPath: metadata.name

deployment.yaml 내용을 보면 CustomResourceDefinition이 존재하지 않는다. etcd-operator가 자동으로 CRD를 생성하기 때문에 아래와 같이 CRD를 확인할 수 있다.

$ kubectl get customresourcedefinitions
NAME KIND
etcdclusters.etcd.database.coreos.com CustomResourceDefinition.v1beta1.apiextensions.k8s.io

etcd cluster create/resize/failover/upgrade

operator를 이용하여 etc cluster를 구성한다. operator를 통한 클러스터 구성내용을 확인하면 아주 단순하다. 버전과 사이즈뿐이다.

$ cat example/example-etcd-cluster.yaml
apiVersion: "etcd.database.coreos.com/v1beta2"
kind: "EtcdCluster"
metadata:
name: "example-etcd-cluster"
## Adding this annotation make this cluster managed by clusterwide operators
## namespaced operators ignore it
# annotations:
# etcd.database.coreos.com/scope: clusterwide
spec:
size: 3
version: "3.2.13"
$ kubectl create -f example/example-etcd-cluster.yaml
etcdcluster.etcd.database.coreos.com/example-etcd-cluster created

순차적으로 etcd cluster가 구성되는것을 볼수 있다.

$ kubectl get pods
NAME READY STATUS RESTARTS AGE
etcd-operator-69b559656f-wrhxz 1/1 Running 0 3h
example-etcd-cluster-2kd4t667j5 1/1 Running 0 1m
example-etcd-cluster-k4lxm96v7h 1/1 Running 0 1m
example-etcd-cluster-lm7mkhvldw 1/1 Running 0 1m

이번에는 scale-out 테스트를 진행한다.
example/example-etcd-cluster.yaml 내용에서 size: 3size: 5 로 변경하고 다시 적용하면 2 node가 추가로 생성된다.

$ kubectl apply -f example/example-etcd-cluster.yaml
$ kubectl get pods
NAME READY STATUS RESTARTS AGE
etcd-operator-69b559656f-wrhxz 1/1 Running 0 3h
example-etcd-cluster-2kd4t667j5 1/1 Running 0 9m
example-etcd-cluster-2pwm84lrf4 1/1 Running 0 34s
example-etcd-cluster-97qk6gs4sp 1/1 Running 0 50s
example-etcd-cluster-k4lxm96v7h 1/1 Running 0 9m
example-etcd-cluster-lm7mkhvldw 1/1 Running 0 8m

반대로 줄이는것도 동일하다.

failover 테스트의 경우에도 그냥 pod를 삭제하거나 worker를 날리는것으로도 동일하게 spec을 유지하는 kubernetes resource 특성으로 인해 바로 생성이 되는것을 확인할수 있다.

이번에는 operator만 날려보겠다. 아래처럼 operator deployment만 삭제를 해도 pods는 남아있는것을 볼수 있다.

$ kubectl delete -f example/deployment.yaml
deployment "etcd-operator" deleted
deployment.extensions "etcd-operator" deleted
$ kubectl get pod
NAME READY STATUS RESTARTS AGE
example-etcd-cluster-2kd4t667j5 1/1 Running 0 14m
example-etcd-cluster-2pwm84lrf4 1/1 Running 0 5m
example-etcd-cluster-97qk6gs4sp 1/1 Running 0 5m
example-etcd-cluster-k4lxm96v7h 1/1 Running 0 14m
example-etcd-cluster-lm7mkhvldw 1/1 Running 0 13m

etcd pod 하나를 날려본다. 4개 pod만 남은것을 확인할 수 있다.

$ kubectl delete pod example-etcd-cluster-2kd4t667j5 --now
pod "example-etcd-cluster-2kd4t667j5" deleted
$ kubectl get pod
NAME READY STATUS RESTARTS AGE
example-etcd-cluster-2pwm84lrf4 1/1 Running 0 9m
example-etcd-cluster-97qk6gs4sp 1/1 Running 0 9m
example-etcd-cluster-k4lxm96v7h 1/1 Running 0 18m
example-etcd-cluster-lm7mkhvldw 1/1 Running 0 17m

다시한번 operator를 배포하게 되면 잠시후에 5개로 다시 pod가 복원된것을 확인할수 있다.

$ kubectl create -f example/deployment.yaml
deployment.extensions/etcd-operator created
$ kubectl get pod
NAME READY STATUS RESTARTS AGE
etcd-operator-69b559656f-8ks8m 1/1 Running 0 44s
example-etcd-cluster-2pwm84lrf4 1/1 Running 0 11m
example-etcd-cluster-97qk6gs4sp 1/1 Running 0 11m
example-etcd-cluster-k4lxm96v7h 1/1 Running 0 20m
example-etcd-cluster-kskgvlbsm9 1/1 Running 0 10s
example-etcd-cluster-lm7mkhvldw 1/1 Running 0 19m

업그레이드의 경우도 다른 resource와 동일하게 version 부분을 변경하여 rollout이 가능하다.

정리

다음 소스를 통해 직접 operator를 개발이 가능하다.
(Source: https://coreos.com/operators/)

Operator SDK를 사용하면 Kubernetes API 상세스펙을 배우지 않고도 쉽게 operator 빌드가 가능하다. 또한 관리를 위한 Operator Lifecycle Manager나 Operator Metering 같은 기능을 사용하여 좀더 관리측면에서 강화하고자 하는 CoreOS진영의 노력이 보이는듯 하다.

아직 alpha, beta단계의 operator 프로젝트들이 대부분이지만 helm차트와 같이 kubernetes API 스펙을 이해하고 사용하지 않고도 쉽게 운영자가 기반 어플리케이션을 관리 할수 있다는것으로 보아 향후 RedHat이나 Oracle 진영에서 본인들 kubernetes 관련 제품들을 홍보하고 서비스라인에 포함시키는 방향으로 적극적으로 개발을 하고 있는것으로 보인다. 앞으로 mysql, redis, kakfa 등을 operator로 배포하고 관리하는 일이 더 많아 질것 같다.