6월 28일에 Openinfraday에서 발표한 내용
발표 영상
Custom Resource 에 대한 내용은 상세하게 더 정리해야겠다.
Kubernetes(이하 k8s)기반 개발 과제를 수행하다보니 Custom Resource를 사용할수 밖에 없는 상황들이 발생하였다.
그런 와중에 istio와 같은 Service Mesh Layer를 리서치하던 중에 튀어나온 MutatingAdmissionWebhook 용어를 이해하기 위에 조사한 내용을 정리해본다.
https://kubernetes.io/docs/reference/access-authn-authz/admission-controllers/
Admission controller는 쿠버네티스 api-server의 오브젝트(Pod,등) 생성 요청을 가로체어 제어를 할 수 있는 확장 기능으로 플러그인 형태로 사용자가 추가 할 수 있다.
좀더 자세히 확인해보자
Webhook을 사용하여 k8s cluster-admin이 api-server를 다시 컴파일하지 않고도 object생성 요청시 mutating(변경) 및 validation(유효성검증) 을 하는 플러그인을 만들 수 있다.
이를 통해 개발자는 모든 resource 에서 여러 작업 ( "CREATE", "UPDATE", "DELETE"...)에 대한 승인 로직에 대해 사용자 정의 할 수있는 유연성을 제공받는다.
resource를 생성하기 전에 변경
(예, Istio 에서 처럼 traffic management 와 policy enforcement 을 위해 Envoy sidecar container를 injection)
StorageClass Provisioning 자동화
(PersistentVolumeClaim object 생성을 모니터링하고 미리 정의 된 정책에 따라 객체에 storage를 자동으로 추가. 사용자는 StorageClass 생성 에 신경 쓸 필요가 없음)
복잡한 custom resource 검증 (Agones와 같은)namespace 제한
멀티 테넌트 시스템에서는 reserved namespace에 resource생성을 금지시킬때 사용할수 있음
참고 예시
https://github.com/kelseyhightower/denyenv-validating-admission-webhook
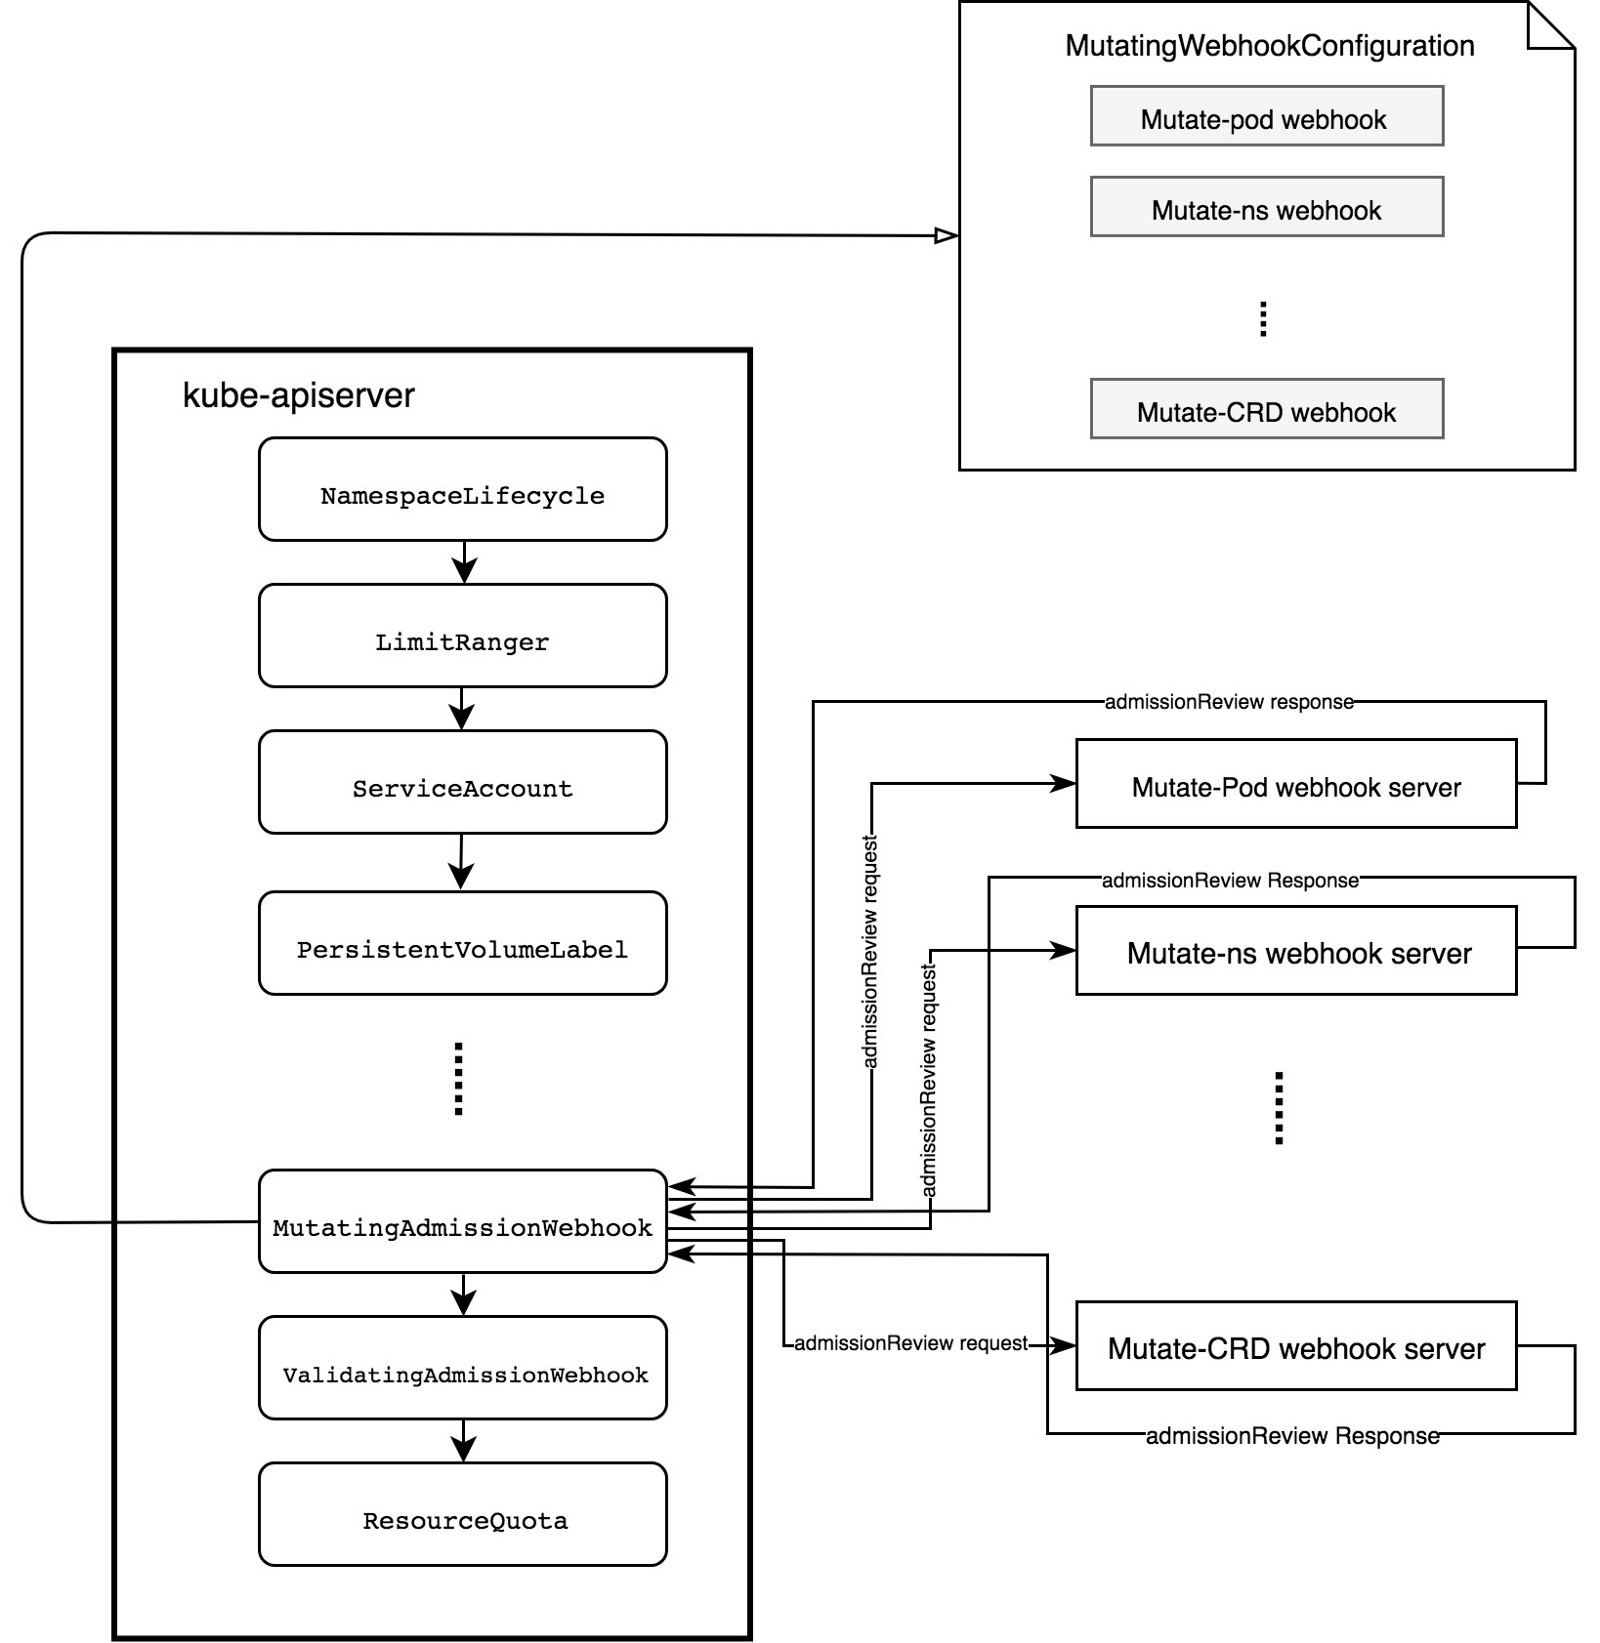
MutatingWebhookConfiguration 내에 정의된 룰에 따라 etcd로 전달되기 전에 request를 intercept한다.
webhook 서버에 승인 요청을 전송하여 변이를 실행한다.
webhook 서버는 API를 준수하는 단순한 http서버.

https://github.com/morvencao/kube-mutating-webhook-tutorial
위 튜토리얼은 object가 생성되기 전에 pod에 nginx sidecar container를 inject하는 MutatingAdmissionWebhook을 배포하는 내용을 담고 있다.
우선 admissionregistration.k8s.io/v1beta1 API를 사용할수 있는 k8s 1.9+ 이상의 클러스터가 필요하다.
$ kubectl api-versions | grep admissionregistration.k8s.io/v1beta1
아래와 같은 결과가 나와야함
admissionregistration.k8s.io/v1beta1
일단 Go가 설치되어 있어야 한다.
~/go/src 아래에 clone을 하였음.
$ cd ~/go/src
$ git clone https://github.com/morvencao/kube-mutating-webhook-tutorial.git
의존성 관리를 위해 repo는 dep를 사용함
$ cd kube-mutating-webhook-tutorial
$ go get -u github.com/golang/dep/cmd/dep
build 파일 확인하고 registry 위치를 바꿈
dep ensure
CGO_ENABLED=0 GOOS=linux go build -a -installsuffix cgo -o kube-mutating-webhook-tutorial .
docker build --no-cache -t registry.*****.io/agones/sidecar-injector:v1 .
rm -rf kube-mutating-webhook-tutorial

docker push registry.*****.io/agones/sidecar-injector:v1
build하고 docker image push
$ ./build
Sending build context to Docker daemon  44.29MB
Step 1/3 : FROM alpine:latest
 ---> 3fd9065eaf02
Step 2/3 : ADD kube-mutating-webhook-tutorial /kube-mutating-webhook-tutorial
 ---> 8679ccbab536
Step 3/3 : ENTRYPOINT ["./kube-mutating-webhook-tutorial"]
 ---> Running in 7699ff5c0885
Removing intermediate container 7699ff5c0885
 ---> 2014100d460e
Successfully built 2014100d460e
Successfully tagged registry.*****.io/agones/sidecar-injector:v1
The push refers to repository [registry.*****.io/agones/sidecar-injector]
2456c1309a51: Pushed
cd7100a72410: Layer already exists
v1: digest: sha256:15c335daeba40ddcbfbc3631ab6daa7cf623b63420f0ae8b657755322ef0582d size: 739
sidecar deployment에 사용되는 secret(cert/key)을 생성한다.
./deployment/webhook-create-signed-cert.sh \
    --service sidecar-injector-webhook-svc \
    --secret sidecar-injector-webhook-certs \
    --namespace default
위에서 생성된 클러스터의 caBundle값을 가지고 MutatingWebhookConfiguration 생성한다.
cat deployment/mutatingwebhook.yaml | \
    deployment/webhook-patch-ca-bundle.sh > \
    deployment/mutatingwebhook-ca-bundle.yaml
resource들 deploy
$ kubectl create -f deployment/nginxconfigmap.yaml
kubectl create -f deployment/configmap.yaml
kubectl create -f deployment/deployment.yaml
kubectl create -f deployment/service.yaml
kubectl create -f deployment/mutatingwebhook-ca-bundle.yaml

configmap "nginx-configmap" created
configmap "sidecar-injector-webhook-configmap" created
deployment.extensions "sidecar-injector-webhook-deployment" created
service "sidecar-injector-webhook-svc" created
mutatingwebhookconfiguration.admissionregistration.k8s.io "sidecar-injector-webhook-cfg" created
webhook deployment 확인
$ kubectl get pods
NAME                                                   READY     STATUS    RESTARTS   AGE
sidecar-injector-webhook-deployment-796955558f-js6bb   1/1       Running   0          3m

$ kubectl get deployment
NAME                                  DESIRED   CURRENT   UP-TO-DATE   AVAILABLE   AGE
sidecar-injector-webhook-deployment   1         1         1            1           3m
default 네임스페이스에 sidecar-injector 라벨링을 한다. 이렇게 하면 해당 네임스페이스에 생성되는 모든 app에 자동으로 injection하게 됨
$ kubectl get namespace -L sidecar-injector
NAME             STATUS    AGE       SIDECAR-INJECTOR
agones-system    Active    1d
default          Active    19d       enabled
ibm-cert-store   Active    19d
ibm-system       Active    19d
ingress-test     Active    6d
kube-public      Active    19d
kube-system      Active    19d
spinnaker        Active    12d
xonotic          Active    1d
샘플앱을 디플로이 해보자
$ cat <<EOF | kubectl create -f -
apiVersion: extensions/v1beta1
kind: Deployment
metadata:
  name: sleep
spec:
  replicas: 1
  template:
    metadata:
      annotations:
        sidecar-injector-webhook.morven.me/inject: "yes"
      labels:
        app: sleep
    spec:
      containers:
      - name: sleep
        image: tutum/curl
        command: ["/bin/sleep","infinity"]
        imagePullPolicy:
EOF
deployment.extensions "sleep" created
sidecar container injection 확인
아래 결과를 보면 하나의 deployment 하나의 container 생성을 요청했지만 nginx sidecar 컨테이너가 injection 된것을 확인할 수 있다.
$ kubectl get pod
NAME                                                   READY     STATUS    RESTARTS   AGE
sidecar-injector-webhook-deployment-796955558f-js6bb   1/1       Running   0          2h
sleep-74b46f8bd7-r9l7f                                 2/2       Running   0          42s

$ kubectl describe pod sleep-74b46f8bd7-r9l7f
Name:           sleep-74b46f8bd7-r9l7f
Namespace:      default
Node:           10.178.188.16/10.178.188.16
Start Time:     Wed, 27 Jun 2018 13:12:47 +0900
Labels:         app=sleep
                pod-template-hash=3060294683
Annotations:    kubernetes.io/psp=ibm-privileged-psp
                sidecar-injector-webhook.morven.me/inject=yes
                sidecar-injector-webhook.morven.me/status=injected
Status:         Running
IP:             172.30.169.30
Controlled By:  ReplicaSet/sleep-74b46f8bd7
Containers:
  sleep:
    Container ID:  docker://728ca7f8e741ad29369312bc006c79683e7e605f3b04586df2477e233f93e451
    Image:         tutum/curl
    Image ID:      docker-pullable://tutum/curl@sha256:b6f16e88387acd4e6326176b212b3dae63f5b2134e69560d0b0673cfb0fb976f
    Port:          <none>
    Host Port:     <none>
    Command:
      /bin/sleep
      infinity
    State:          Running
      Started:      Wed, 27 Jun 2018 13:13:01 +0900
    Ready:          True
    Restart Count:  0
    Environment:    <none>
    Mounts:
      /var/run/secrets/kubernetes.io/serviceaccount from default-token-czzpj (ro)
  sidecar-nginx:
    Container ID:   docker://94fd41a0e153de6d5639873ccbd6b6325cee1ea8351dd02ab4a48ab4004d0b58
    Image:          nginx:1.12.2
    Image ID:       docker-pullable://nginx@sha256:72daaf46f11cc753c4eab981cbf869919bd1fee3d2170a2adeac12400f494728
    Port:           80/TCP
    Host Port:      0/TCP
    State:          Running
      Started:      Wed, 27 Jun 2018 13:13:08 +0900
    Ready:          True
    Restart Count:  0
    Environment:    <none>
    Mounts:
      /etc/nginx from nginx-conf (rw)
Conditions:
  Type           Status
  Initialized    True
  Ready          True
  PodScheduled   True
Volumes:
  default-token-czzpj:
    Type:        Secret (a volume populated by a Secret)
    SecretName:  default-token-czzpj
    Optional:    false
  nginx-conf:
    Type:        ConfigMap (a volume populated by a ConfigMap)
    Name:        nginx-configmap
    Optional:    false
QoS Class:       BestEffort
Node-Selectors:  <none>
Tolerations:     node.kubernetes.io/not-ready:NoExecute for 300s
                 node.kubernetes.io/unreachable:NoExecute for 300s
Events:
  Type    Reason                 Age   From                    Message
  ----    ------                 ----  ----                    -------
  Normal  Scheduled              1m    default-scheduler       Successfully assigned sleep-74b46f8bd7-r9l7f to 10.178.188.16
  Normal  SuccessfulMountVolume  1m    kubelet, 10.178.188.16  MountVolume.SetUp succeeded for volume "nginx-conf"
  Normal  SuccessfulMountVolume  1m    kubelet, 10.178.188.16  MountVolume.SetUp succeeded for volume "default-token-czzpj"
  Normal  Pulling                1m    kubelet, 10.178.188.16  pulling image "tutum/curl"
  Normal  Pulled                 55s   kubelet, 10.178.188.16  Successfully pulled image "tutum/curl"
  Normal  Created                55s   kubelet, 10.178.188.16  Created container
  Normal  Started                55s   kubelet, 10.178.188.16  Started container
  Normal  Pulling                55s   kubelet, 10.178.188.16  pulling image "nginx:1.12.2"
  Normal  Pulled                 48s   kubelet, 10.178.188.16  Successfully pulled image "nginx:1.12.2"
  Normal  Created                48s   kubelet, 10.178.188.16  Created container
  Normal  Started                48s   kubelet, 10.178.188.16  Started container
결국 위에서 언급한것 처럼 MutationWebhook은 istio RouteRule같은 별도의 CustomResource등을 injection 하거나 agones 등과 같이 게임서버외에 client sdk 통신을 위한 injection 형태로 기존 resource에 추가적인 변경(mutation) 또는 검증(validation)등의 추가적인 작업을 kube-api의 컴파일없이 가능하다는데 목적이 있다고 볼 수 있다. 추가적으로 기능에 대한 내용은 이후 다시 정리해볼 예정이다.